
 How complete and systematic is your climbing wall? How good is it for training? As you try to answer these questions, you might realise that you are not too sure how to measure how good its structures are. A possible approach would be to see how far they are from an ideal gym, a place that has it all. Consequently, this is probably a good time to sit down and try to figure out what an ideal gym should be like.
Strong of our travelling experience and the advice of experienced coaches and sport therapists, we have decided to distill our knowledge in a series of articles that aim at creating a benchmark useful to anyone planning to build or renew a climbing wall.
Photo: The 9a fingers of Wolfgang Güllich at work © Thomas Ballenberger
In the last few years, the Rest Jug team has collectively visited over 20 climbing centres around Europe. As the tally started to increase, it came natural to think of the great and useful things we had tried in various places. In the same way, we wished that all we had tested (and found useful) could be present at most climbing walls. After all, if you walk into a normal gym or fitness centre, you are likely to see those machines, those tools and those weights that allow you to get that same work out whether you are in Rome, Tokyo, Buenos Aires or Chicago. Fitness and body building have a standard which is widely spread and based on solid principles. But it’s not the same for climbing.
And while we couldn’t quite understand why it wasn’t the same, we thought that we could do something to improve on the current situation. And this something is to create a series of articles to define a “best of”, a benchmark of the ideal climbing wall.
Before we start, some clarifications are due:
These articles WILL NOT BE
- a training guide: the purpose is not to explain in detail how to get the best out of the facilities we list and describe.
- set in stone: as we gather knowledge, as new things come up, we will add, take away of change content. We don’t want these articles to become obsolete, ever.
These articles WILL BE
- a reference for ambitious and motivated climbing wall owners and managers who want to offer their climbers the very best. At the same time, they can be a means for climbers to ask more out of the structures they attend.
- collaborative: the articles will be open not only to our changes but to yours as well. If you think we have missed something that’s truly significant, let us know and we’ll make amends. The same goes if you have seen an even better example of one of the tools we have listed. Just let us know.
In this first article, we are going to talk about tools that are conceived to increase the strength, power and endurance of your fingers (and arms), which are obviously critical for climbing, as well as your upper body as a whole.
We agree with renowned all-round climber and coach Dave MacLeod when he writes “your fingers can never be too strong for climbing”.
And we agree with Tomáš Mrázek (two time World Champion and one time overall World Cup winner in lead) when he says that “finger strength is a good basis: what the fingers can hold on to, the rest of the body can climb through”.
So here we go…
CAMPUS BOARD

A campus board with some positive rungs for the feet, as seen at the Westway, London © Rest Jug
The campus board, invented by top climber Wolfgang Güllich in 1988, is easily the most iconic tool for climbing training. We won’t list all the details, they’re just an internet search away, so help yourself. And if you want to see some of the very strongest athletes working the campus board, we suggest these two videos, one and two.
What we’d like to bring to your attention, instead, is the fact that most campus boards are set up to be a tool for already advanced climbers to train explosive power and muscle fibre recruitment.
However, with the addition of few rungs for the feet, campus boards can become a great tool to train power endurance too, as explained by the illustrious Steve McClure in this article. Unloading some body weight on the feet can also help beginners to build some basic power and recruitment in a situation that can easily be more controlled and structured and therefore both safer and more effective than desperate, at-your-very-limit bouldering.
We have seen a number of campus boards sporting some tiny, shy foothold chips (at times just one!). This is not enough and here on the right you can see a good example of how we believe footholds should be provided.
Another interesting tweak that can make a campus board more complete is the addition of sloper rungs. Slopers are some of the safest holds to train power on because the load on fingers is distributed well among pulleys and tendons.
They also tend to be neglected as a grip type in general, so training them more will naturally address a weakness of many people. Including slopers on a campus board can be as easy as just putting some wooden logs. A great example is shown below.
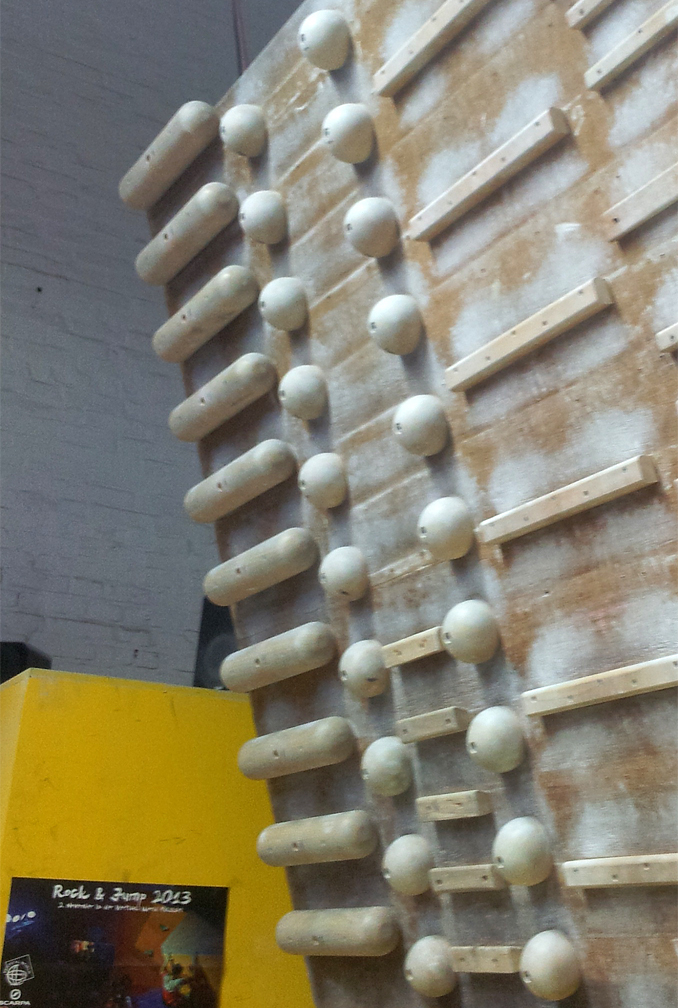
A detail of a clever campus board which includes sloper rungs and ball slopers, as seen at the Chimpanzodrome in Cologne © Rest Jug
FINGERBOARDS
While campus board variations tend to have stuck to the original model, possibly out of respect for its prematurely departed inventor, fingerboards have grown into a remarkable variety of forms, with many manufacturers producing many different models. They tend to cater for a wide variety of holds and therefore grips, but very often they fail at one important aspect: catering for your progression in time.
A little preambole is needed: finger strength is one of the hardest things and slowest things to develop in climbing. As Dave MacLeod says ( yes, we’ll quote him a lot!) “Build it slowly. We are not anatomically designed to get strong fingers, so trying to shortcut the process of getting strong by training too hard for a few months gains only finger injuries”. Small increments are also key for the tendons, pulleys, joint capsules and ligaments which are heavily involved in the finger workout climbing requires. That’s also because all these parts of our muscoskeletal system adapt much more slowly to overload than, for instance, muscles themselves.

Ideally, you should hang your fingerboards to a beam, which allows for more than just frontal hangs and pull-ups. As seen at Klättercentret in Telefonplan, Stockholm © Rest Jug
So back to the fingerboards, you might find one that has an edge you can half-crimp on for about 8-10 seconds before failure. You might then work a sensible routine and eventually you can dead-hanging from that edge for maybe 15 seconds or more. If you have any basic knowledge of strength training, you’ll know that you need to crank it up eventually, or you’ll be training endurance, not strength. But where do you go from there? The next smaller edge on the fingerboard you are using could be something you can’t even hang to for 5 seconds. What about using the same hold but with some weight added? You could wear a harness and tie a 5kg dumbell to it, if there is one around. But will 5kg be too much? Will it be too little?

The Transgression fingerboard as seen at Klättercentret in Telefonplan, Stockholm © Rest Jug
The answer to these dilemmas is a fingerboard set-up that can allow for measurable and small increases in both added weight and hold size. In sayin this, we quote some proper academic research by Professor Juan José González-Badillo and Eva López-Rivera which shows that mixing the two approaches in a specific order is ideal for most people.
The problem of adding weight can be easily fixed by ensuring a complete and orderly rack of weights is placed close to the fingerboard area of the gym. Not just a few random discs but something that can allow for minimal increments and that is close to where the fingerboards are.
Another interesting method that is actually about subtracting weight (under the condition that you hang with one arm only, though) is the use of a sling as clearly explained by monster boulderer Chris Webb Parsons in this interesting video.
The sling would work best if present on both sides of the fingerboard, which in turn are best mounted on a somehow thin beam structure, which allows for hangs and pull-ups that are both pronated (i.e. you face the back of your hand), supinated (i.e. you face the palm of your hand) and parallel/sideways.
However, if you want some pretty scientific and measurable approach to the reduction in size of the edge you are hanging from, the most valid solution at the moment would be the fingerboards that the aforementioned Eva López-Rivera developed. Her products look like small, one-piece campus boards, but each rung is in fact an edge of decreasing depth. For instance, one of the boards features edges that are 30, 24, 20, 18, 16, 14, 12 and 10 mm deep, allowing for a very controlled progression through time, as long as you are judicious enough!
SYSTEM WALLS
System walls (a.k.a. system boards) could be defined as a cross between a fingerboard and a campus board. They are (or at least should be) a facility on which you can train a variety of grips (like on most fingerboards) but in a dynamic fashion (like on a campus board). System boards should essentially be a set of holds placed symmetrically left to right on an overhanging panel. This set should then be repeated a few times above the first one.
System walls can easily be built with any holds, assuming you have enough identical holds so that you can actually train specific grips and movements systematically. However, there are some ready-made solution that your climbing gym might want to adopt.
A prominent one is the Hypergravity Isolation Training Strip™ system designed by Eric Hörst, one of the most experienced and definitely the most prolific climbing coach in the USA. His system, called HIT for short, is a specific set of holds that allows to train 6 different grip types. Moreover, Mr Hörst has also thought of guidelines to be followed when working on his system, with workouts that include the use of a weighted belt or a weighted vest (hence “hypergravity”). You can find some of them on the website of Necro, the manufacturer of the special strip holds and pinch holds devised by Eric Hörst. We have also found a good video of somebody working on the system, which spares you from having to go through the embarassing results you get from YouTube when you look for “hit strip” ; )

An extremely complete system board incorporating the HIT Strip™ and pinches, plus other specific holds, as seen at Klatreverket, Oslo. The inclination of the panel can be adjusted and a weight vest can be found nearby. © Rest Jug
NOTE: there’s a number of system walls that train more than just the upper body and whose use includes, for instance, climbing footwork. Because of this, we deemed them inappropriate for this article but we’ll discuss them in the next one.
PULL-UP BAR
A pull-up bar is the go-to piece of equipment to develop the basic pulling strength that is needed even on just slightly overhanging climbs. It works your biceps, your back and, especially, your abs as explained quite scientifically in this excellent article from a body building magazine. However, we haven’t seen perfectly set up bars very often so it’s definitely worth discussing what makes a good one.
First, there should be enough space above and around the bar to allow you to do dips and front levers on it. Secondly, the bar should be thick enough so that pushing down on it won’t be awkward or feel unsafe for your wrists. The thickness of the metal pipes commonly used for scaffoldings (between 6 and 8 centimetres) should be good for most adults.
Ensuring that these two principles are adhered to should already let you perform interesting exercises such as the muscle-up (i.e. a pull-up going straight into a dip), which is really relevant to certain styles of bouldering. If you went bouldering in Fontainebleau and those mantle tops were the bane of your existence, check out how a proper set-up for your gym’s pull-up bar can make the difference.

German top boulderer Jan Hojer performs a muscle-up on a bar © Jan Hojer’s Vimeo channel
Finally, a couple of slings tied to the bar can help the less powerful climbers to gradually get used to lock-off on one single arm.
ASSISTED PULL-UP MACHINE

A machine for assisted pull-ups, as seen at the Golden Gym in Milan © Rest Jug
Many hardcore climbers would probably sneer at the presence of training machines in their gym and, to a certain extent, there is a good reason for it. Full body exercises and movements should always be preferred to machines that isolate single muscles, as the former also develop coordination and balance, which are very important in climbing.
This said, many complete beginners, especially if not young and/or used to train, won’t be able to do even a single pull-up, no matter how hard they try. Misled by the idea that “their arms are not strong enough”, they might start to do bicep curls and the like, ignoring that being able to pull yourself on some holds is also (if not mostly) a matter of core muscles in the back and abdomen, and of their coordindated interaction.
In order to get results, a machine for assisted pull-ups is therefore very valuable, as it will allow anyone to start from a level where they can do at least a few repetitions with ease and therefore develop the correct form and technique to get the best out of this exercise.
In a nutshell, if there’s one training machine a climbing wall should ever consider buying, we believe it’s this one.
SWIVEL BARS
Ok, we are entering a new generation of tools for climbing conditioning here, courtesy of two products.
The Swiss-made Turn Till Burn was developed and tested by Dr Andreas Schweizer, an orthopaedic surgeon with a specialism in hand surgery. And this alone should already cover the “yeah, science!” requirements for most people. The product is a solid metal bar that rotates on its long axis. Once hung horizontally and grabbed with your fingertips in an open-hand or comfortable half-crimp position, it allows you to exert your finger flexors as you pull yourself up by clenching your fingers on the rotating bar (and then down, by loosening your grip on the bar).

That’s how we roll – The Turn Till Burn bar in action © Rest Jug
In this way, you are exerting your fingers’ flexor muscles in both concentric and eccentric ways and with an isotonic (i.e. dynamic) contraction. This workout is more varied than the typical climbing conditioning (which is always isometric for fingers) and is therefore a great way to mix up the stimuli you are giving to your muscles. We talked about this with Cristiano Costa Da Silva, a senior physiotherapist based in London (and with 20+ years of climbing experience too!) and he ackonwledges the usefulness of these exercises. He confirmed that eccentric contractions of the finger flexors (i.e. the muscles that bursts with lactic acid when you are pumped) occur rarely (if ever) while climbing and that eccentric work is particularly good to strengthen tendons. Eccentric workout will also minimise the risk of traumatic and overuse injuries to the tendons and the risk of them being overgrown by the muscles.
Finally, the continuously varying angle that your finger joints assume while using the Turn Till Burn means that the risk of injuries of the joints is also minimised.

A Turn Till Burn bar hanging from a sturdy beam, together with the various fingerboards of Rock Spot South East, Milan © Rock Spot South East website
Similar in concept but even more hardcore in its actualisation is instead the Rollybar created by Lapis, a Slovenian manufacturer of holds, walls and training accessories. As the most informed readers will know, Slovenia is a country which managed to breed some of the strongest competition climbers of the last 10 years, despite having a limited population pool and enough good rock that it hardly makes sense for them to build enormous gyms. Consequently, it’s safe to assume that they got more than a couple of things right when it comes to training and conditioning, and this is one of them.
The Rollybar is a rotating bar that is thick enough to force you grabbing it with a relatively open hand grip. By doing this, the bar will rotate towards you and you hands will go from being on top of to the bar to being on the lower part, thus making you fall, unless you counteract the rolling by applying more force with your forearms. It’s almost arm wrestling combined with pull-up exercises. Initially it’s really disconcerting, but soon it becomes a lot of fun. This tool works very well together with hanging rock balls as shown in these two training videos of the Slovenian and German teams. Rock balls should also be your weapon of choice to train pinch grips, see the section below for more…

A mean set up of Rollybar and rock balls, as seen at the Sports Hall Zlato polje in Kranj © Rest Jug
PINCH TRAINING
Training pinch strength is easily one of the most delicate aspects of climbing conditioning. The very informed Eva López tells us straight away, through an article of her blog, that training pinches while hanging directly below a board is not an ideal situation, unless you can have very specific structures and have great levels of body strength (and the technique to match) needed to perform front lever hangs. Canadian super climber Sonnie Trotter also warns us about the risks of dead hanging while pinching, again thanks to a blog entry.
The only exception seems to be the use of rock balls, as Eva explains, and even then you need to have good form.
But if we can’t easily hang from a pinch, maybe the pinch can hang from us! In fact, both the aforementioned expert climbers/coaches speak well of holding a block to which some weight is attached. This actually allows to select a very precise load (if you have a good rack of dumbells at hand, that is), with all the progression advantages that we explained in the fingerboard section. Different people have hands of different sizes: a wide, extreme pinch grip for a tiny climber could be a comfrotable one for a larger individual. Therefore, you would want your gym to prepare maybe up to 5 blocks of different sizes/shapes like those Sonnie Trotter shows. Using a few wooden tablets with a hole the size of a dumbell drilled through can work too, albeit it might be time consuming to regulate each time.

Examples of structured training for the pinch grip, both in terms of weight and in terms of width of the grip © SonnieTrotter.com (first two on the left), en-eva-lopez.blogspot (last three to the right)
SLINGS & RINGS
Exercise slings and gymnastics rings are excellent tools to perform useful exercises that can address a number of muscles at the same time. We talked to Stian Christophersen, who is a professional physiotherapist and the coach of the national Norwegian team (not to mention an 8B and 8c climber). Stian confirmed that the advantages of slings are many, the most important being:
- By nature, they are an unstable support to exercise on, which means they will improve the stability of your muscles. They also work on the synergy between your muscles and the nervous system as they both have to work very hard to maintain a given position. Slings will strengthen your body by “educating” it too, so to speak.
- They allow for a great range of motion, thus reinforcing muscles in their full range. Some of the workout you can do with slings is simply unattainable in other methods (weights or even bodyweight exercises).
- Because of the two previous points, they provide a workout that is similar to climbing, but of course in a more controlled fashion. Consequently, they are a very good training method to prevent injuries of shoulders and back, an injury type which has set back for long periods (i.e. surgery) even climbers of the caliber of Dave Graham, Beth Rodden, Patxi Usobiaga Lakunza and Angela Eiter.
A truly wide range of exercises can be performed on slings and rings, so we would recommend that your climbing wall provides some guidelines (e.g. pictures or drawings) on what exercises are best for general climbing purposes. Here is a good video of Magnus Midtbø showing some sling exercises that are pertinent to climbing. Although there is a number of adjustable sling manufacturers on the market, you can create a do-it-yourself pair of slings quite easily by just using a couple of climbing rope segments and attaching the slings to them through a friction knot such a Prusik or a Marchand (thanks to the guys at Oslo’s Klatreverket for the tip!).

Rope slings and gymnastics rings as seen at (respectively) Klatreverket in Oslo and the Westway in London © Rest Jug

A basic pegboard as we tried it at Copenhagen Boulders © Rest Jug
CLIMBING PEG BOARD
Ah, the joy of training power in your arms and core body with the knowledge that you are not risking to overwork your fingers and forearms like you could on a campus board!
The peg board is a thick wooden plank with 3-4cm holes drilled in a regular pattern. Using two wooden pegs that are sized to fit in the holes and not come out when weighted, you are meant to climb up and down the board without using your feet.
It is a great tool climbers can borrow from gymnasts to isolate some of the aspects trained by campusing (including coordination, to a certain degree) and it’s actually some pretty addictive fun once you get the minimum fitness required to use it properly.
Finally, the peg board is also one of the tools recommended by German trainers Patrick Matros and Dicki Korb in their recent book Gimme Kraft. They also realeased a video trailer of the then forthcoming book, in which you can see Alexander Megos doing peg board exercises from around 03:40.
BACHAR LADDER
Another tool that allows to work on arms and core while keeping fingers relatively safe, the Bachar ladder was popularised by great climber and fitness fanatic John Bachar (1957-2009). It is a rope ladder with wooden or plastic rungs. It is usually hung at a 20-30° overhang and with some slack in it, which makes it a bit harder for your core muscles to deal with. Unlike the peg board, you can use your feet to help you here, which makes the Bachar ladder a much more accessible training tool for less fit climbers. It’s also pretty inexpensive to build/buy, so no excuses for your local gym not to have one!

Training on the Bachar Ladder as seen at the Westway, London © Westwayclimbingcentre.blogspot
RACK OF WEIGHTS/DUMBELLS
As simple as it sounds, it is something we have seen very rarely in the many climbing walls we have visited. The example below is really good, offering a wide range of weights starting from some very light ones, which are particularly useful for some compensation exercise for tennis elbow and golfer’s elbow as described by Dr. Julian Saunders. The main purpose of a good set of dumbells, though, will be to allow for systematic and measurable overloading during a number of exercises such as dead hangs and pull-ups. Ask your gym to spare a couple of old harnesses, tie one end of a rope segment to the tie-in loops, make a slip knot at the other end and voilà, your training will never be the same again.

A complete set of dumbells allowing for systematic overload training, as seen as Klatreverket, Oslo © Rest Jug
So… this is the end of our first article trying to describe what an ideal gym should look like. As stated at the beginning, we are looking forward to contributions and suggestions. There’s obviously a number of things we have not mentioned, such as slacklines, inclinable panels, boulder circuits etc but that’s because they belong to forthcoming articles. Therefore, please ensure that your suggestions are relevant to what we have discussed in this first article for the time being.
Return to the Rest Jug homepage by clicking here.
Liked this article? Let us know by liking our facebook page!
Or share it
Leave a Reply
You must be logged in to post a comment.